

Email Editor
Write the subject, preheader and body of a recovery email, and preview it on desktop and mobile.
The editor is where a campaign takes shape: what the shopper sees in their inbox, what the email says, and when it sends. You write on the left; a live preview on the right shows the email exactly as it will arrive.
Opening the editor
You get here from the Recovery Campaign tab in any of these ways:
- Click a campaign's name, or choose Edit from its ⋮ menu.
- Click Create New Campaign, pick a template or Start from scratch, then Edit in Classic. See Templates.
- Choose Duplicate from a campaign's ⋮ menu, then open the copy.
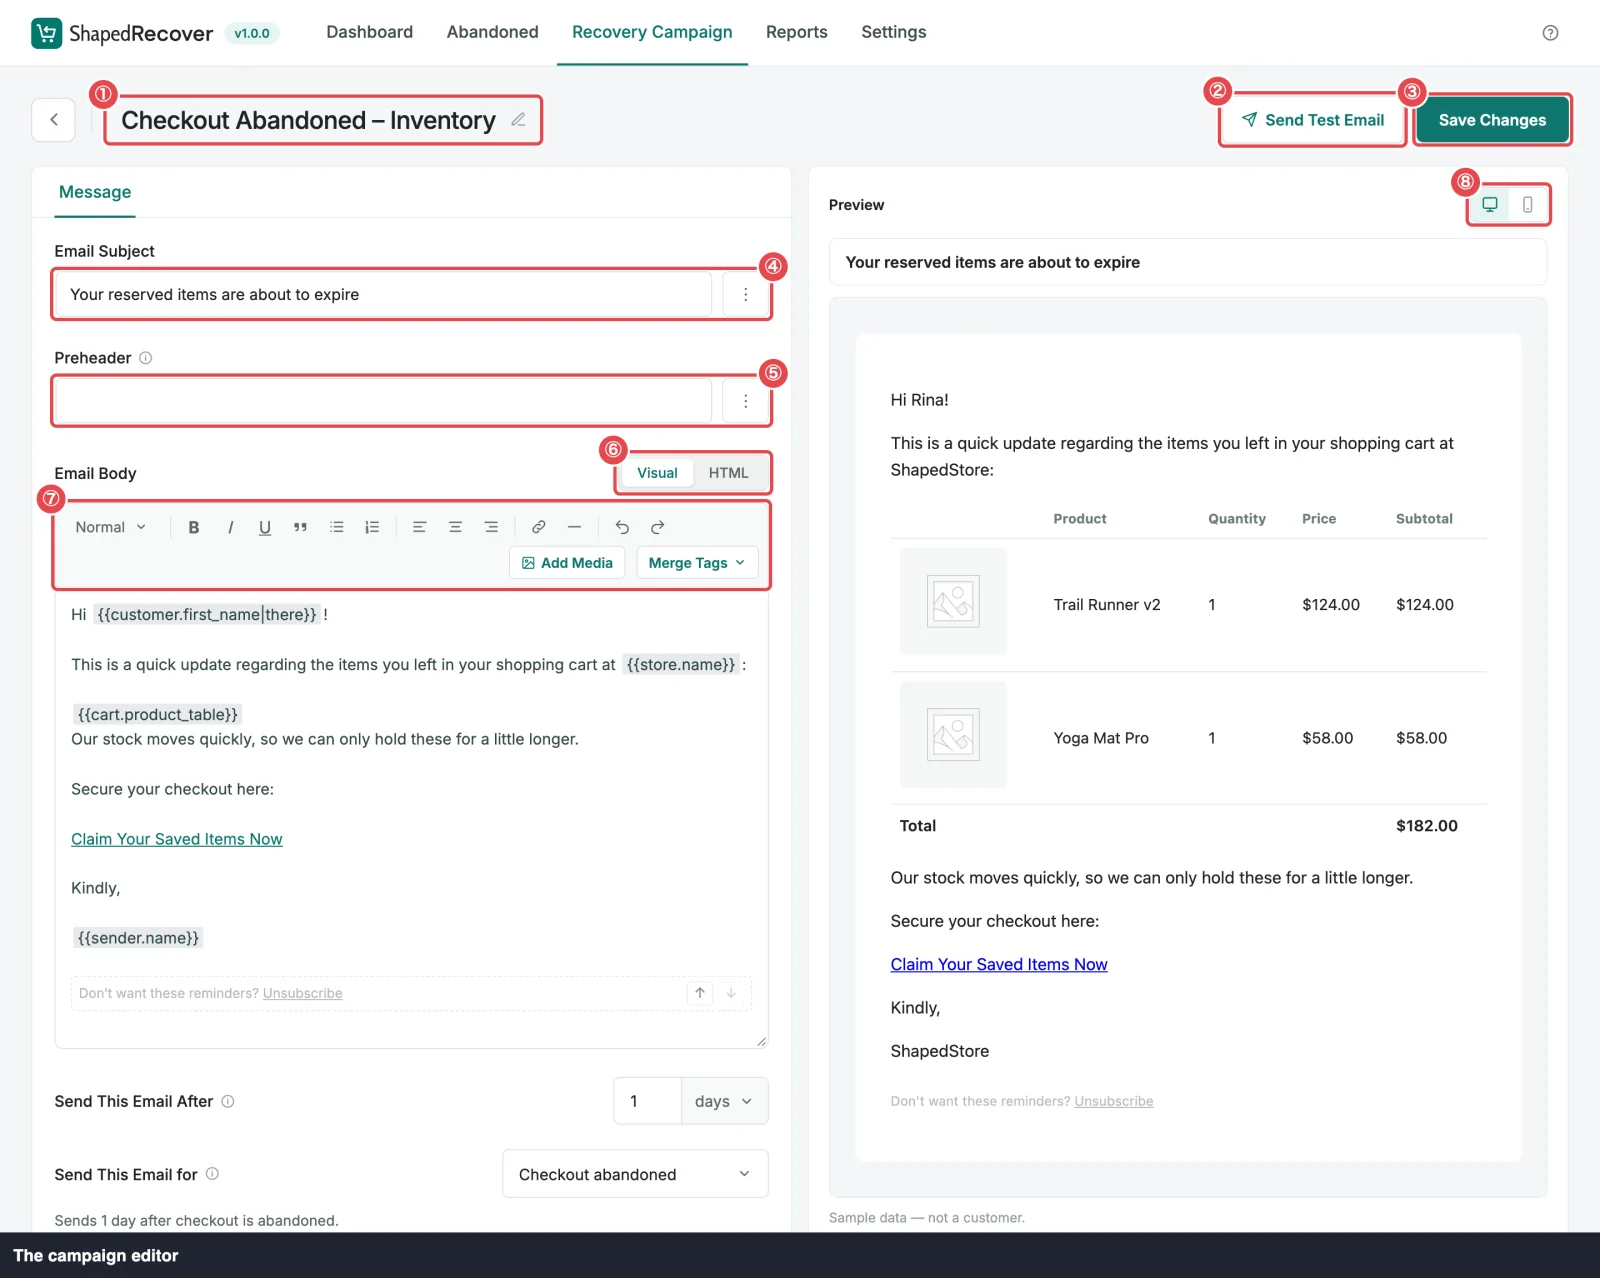
The header
Across the top:
- The back arrow at the far left goes back to the campaign list.
- The campaign name. Click it to rename (the pencil shows it's editable). Shoppers never see it; it's for you. A new campaign shows Untitled campaign until you type one.
- Unsaved changes appears as soon as you change anything.
- Send Test Email sends what's on screen, saved or not, to an address you choose. See Test Email.
- Save Changes saves the campaign. See Saving.
Subject and preheader
The Message tab starts with the two lines a shopper sees before they open the email.
| Field | What it is | Default |
|---|---|---|
| Email Subject | The subject line. Required. | Empty for a blank campaign; the template's subject for a starter |
| Preheader | Shown after the subject in most inboxes: the grey preview text beside or under the subject. Optional, but a good one gets more opens. | Empty |
Both take merge tags, like the shopper's first name or your store name. Click the ⋮ at the end of the field to pick one. It goes in where your cursor is, replacing any selected text.
Write the preheader
Without one, many inboxes show the first words of the body instead, which is often just "Hi Rina!". A preheader like "Your cart is saved — finish in one click" does more work.
Email Body
The body has two modes, switched at the top right of the field:
- Visual: a simple word-processor view with a toolbar. Use this most of the time.
- HTML: the raw HTML, for pasting a design or fine-tuning markup.
Switching is safe; both edit the same body. In Visual mode, merge tags show as small labelled chips so they're easy to spot.
The toolbar
In Visual mode, the toolbar has, from left to right:
| Control | What it does |
|---|---|
| Paragraph style | Normal, or Heading 1 to Heading 6. |
| B, I, U | Bold, italic, underline. |
| Quote | Sets the paragraph as a quote. |
| Bulleted list, Numbered list | Starts or ends a list. |
| Align left, Align center, Align right | Aligns the paragraph. |
| Insert link | Opens the link box. See Links. |
| Divider | Adds a horizontal line. |
| Undo, Redo | Steps back or forward through your edits. |
| Add Media | Inserts an image from your Media Library. See Images. |
| Merge Tags | Inserts a merge tag at the cursor. |
Buttons light up when they apply to the text you've selected, so you can see at a glance that a line is already bold or centred.
Pasting keeps plain text only. Copy a paragraph from a web page or a document and you get its words, without the source's fonts, colours or hidden markup that could break the email's layout. Format it with the toolbar afterwards.
The Merge Tags menu in the body also offers three tags that build a whole block: the Product table, the Coupon box and the Store logo. Each is inserted on its own line, after the paragraph your cursor is in. See Merge Tags.
Links
Select some text and click Insert link. The link box has:
- Link URL: type or paste an address.
- Two one-click choices for your store's own links: Customer's cart, the shopper's personal recovery link, and Store home page. The chosen one shows pressed.
- Insert Link to add it.
To change a link, put the cursor inside it and click Insert link again: the same box opens with Update and Remove. Clicking the link on its own doesn't open it.
Link to the cart, not the shop
For a "Complete your order" button or link, choose Customer's cart. That link rebuilds the shopper's cart and is how a sale gets credited as recovered. A plain link to your shop works, but the shopper starts with an empty cart and the sale won't count. See How Recovery Works.
Images
Click Add Media to open your WordPress Media Library, choose an image, and click Insert into email. ShapedRecover:
- uses the image's alt text from the Media Library, the words shown when an inbox blocks images, so fill that in first;
- sizes it so it's never wider than the email.
To put your logo at the top, the Store logo merge tag is easier: it picks up your WooCommerce email header image or your theme's logo automatically. See Merge Tags.
The Unsubscribe block
Every recovery email ends with a small unsubscribe line. In the editor it's a block in the body, shown just as it sends:
Don't want these reminders? Unsubscribe
It's set small and light grey, so it never competes with your call to action.
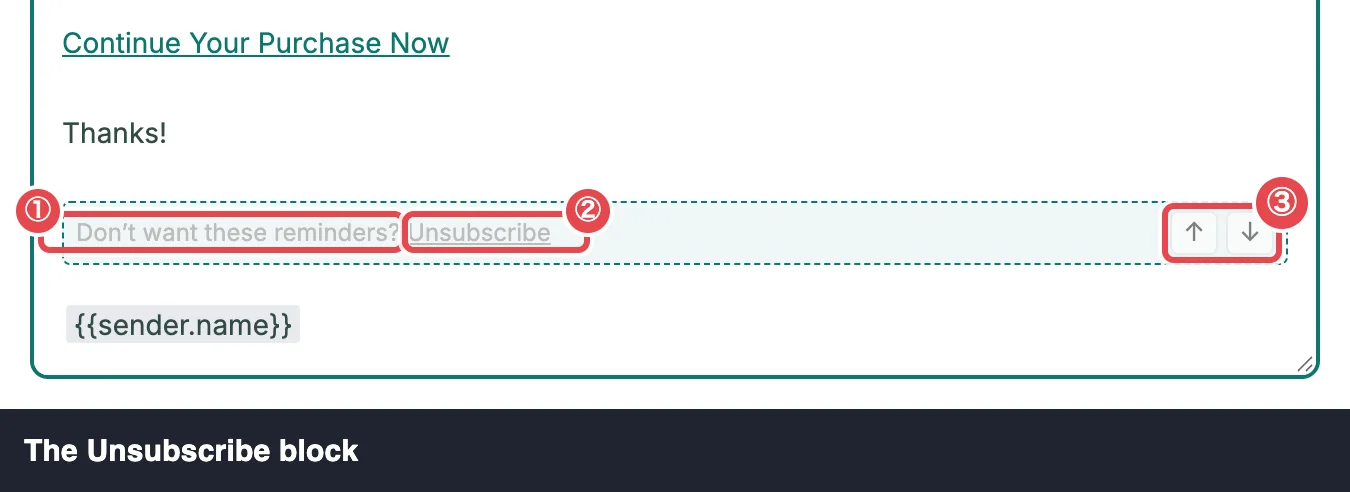
You can:
- Reword it. Click into the text or the link text and type. The text takes up to 200 characters, the link text up to 60. Each is one line. Clear one, or type the original back, and it uses the default: Don't want these reminders? and Unsubscribe.
- Move it. Use ↑ and ↓ on its right to move it up or down one block at a time, say above your sign-off.
You can't delete it. If an edit removes it, the rest of your edit stays and the block goes back where it was, with this note:
The unsubscribe line is required by email law and by Gmail and Yahoo, so it stays. Edit or move it instead.
Every campaign shows the block when it opens, added at the end if the body didn't have one. In HTML mode, it's the line <div>{{unsubscribe.line}}</div>. If you write your own unsubscribe link in HTML mode with the unsubscribe link tag, that link takes the block's place. A body with neither still gets the line added at the end when it sends. There's no way to send a recovery email without a working unsubscribe. See How Sending Works.
Timing and options
Below the body:
- Send This Email After and Send This Email for set the delay and the trigger, with a live sentence under them, like Sends 1 hour after checkout is abandoned. See Triggers & Timing.
- Send a Copy to Admin, Use WooCommerce Email Styling and Modify Product Data. See Email Options.
- Create a Coupon adds a personal discount. See Coupons in Emails.
Preview
The Preview column shows the email as a shopper will see it: the subject and preheader in an inbox-style header, then the full email. It updates a moment after you stop typing, and includes your unsaved changes and options.
- The Desktop and Mobile buttons switch between a 600px desktop width and a 375px phone width. Check both; most recovery emails are read on a phone.
- Merge tags are filled in with a sample shopper, Rina Patel, and a sample cart, so the note under the preview reads Sample data — not a customer.
- Links in the preview open in a new tab, so you can check where they go without leaving the editor. The recovery and unsubscribe links point to your home page here; they only become personal in real emails.
To see the email in a real inbox, send yourself a test email.
Saving
Click Save Changes. You'll see Campaign saved.
A campaign needs three things to save. A missing one is highlighted with its message:
| Missing | Message |
|---|---|
| A name | Campaign name is required to save. |
| A subject | Email subject is required to save. |
| A trigger | Choose at least one trigger. |
The delay must also be a whole number from 5 minutes to 90 days, and options like Send a Copy to Admin check their own fields.
A few more rules:
- A new campaign is saved switched off. Save Changes never switches a campaign on. Do that with the toggle in the Campaign List when you're ready.
- An active campaign must still follow the list's rules. If your new delay clashes with another active campaign on the same trigger, or falls after carts are marked lost, the save is refused and the message shows under Send This Email After. See Why a campaign won't switch on.
Merge-tag warnings
If the subject, preheader or body uses a merge tag ShapedRecover doesn't know, often a typo like {{customer.firstname}}, the campaign still saves, and a yellow warning lists it:
Unknown merge tag {{customer.firstname}}
An unknown tag sends as nothing, so fix it before switching the campaign on. The Merge Tags page lists every valid tag.
Editing a campaign that's switched on
You can edit a live campaign at any time:
- Wording and options are read when each email sends, so your changes reach every email from this campaign that hasn't gone out yet, including ones already scheduled.
- A new delay or trigger applies to carts abandoned from now on, and to waiting carts that had nothing from this campaign yet, if the new send time is still ahead. Emails already scheduled keep their original send time. See Triggers & Timing.
Leaving with unsaved changes
If you click back, or another tab, with unsaved changes, ShapedRecover asks Save your changes?:
- Save & Leave saves, then goes. If the save is refused, you stay so you can fix it.
- Keep Editing stays put.
- Discard drops your changes and goes.
Closing or reloading the browser tab gets your browser's own "leave site?" warning.
What happens to your HTML on save
To keep emails safe and readable in every inbox, ShapedRecover cleans the body each time it's saved, for every user, administrators included:
- Scripts, styles, frames and other non-content blocks are removed with their contents, so a stray stylesheet never shows up as text in the email.
- The rest goes through WordPress's own filter for post content, which keeps ordinary formatting, links, images and tables, and removes anything it doesn't allow.
Merge tags always survive, including inside a link's address. If you paste a full HTML design and something disappears on save, it was markup WordPress doesn't allow in posts. Inline styles on ordinary elements work best.
Where to go next
- Merge Tags: every tag you can use.
- Email Options: product table, admin copy, WooCommerce styling.
- Triggers & Timing: who gets the email and when.
- Test Email: see it in a real inbox.