

A Discount Sequence
Hold the discount back: two friendly reminders first, then a short-lived personal coupon for shoppers who still haven't come back.
A coupon is the strongest nudge a recovery email can give, and the most expensive. This guide is for store owners who want to use one without giving away margin to shoppers who would have bought anyway. You'll set up a three-email sequence that saves the discount for last, protect the coupon from misuse, and measure whether it's earning its keep.
The three starter campaigns already follow this pattern, so if you've done Your First Campaign, most of the setup is a matter of checking and tuning.
A discount sequence in 6 steps
- Plan the sequenceReminder, reminder, then the coupon.
- Set up the two remindersNo discount, no hint of one.
- Set up the coupon emailSmall discount, short expiry, Auto Apply on.
- Tighten the coupon rulesOptional Pro restrictions.
- Test and switch onIn send order, earliest first.
- Measure and adjustRecovered Sales and Revenue per Message.
Why hold the discount back
This is advice, not a rule the plugin enforces. ShapedRecover will happily put a coupon in your very first email if you want it to. But there are good reasons not to:
- Many shoppers just got distracted. A plain reminder is often all it takes, and those sales cost you nothing extra.
- Shoppers learn. If every abandoned checkout earns a coupon within the hour, regular customers work that out and start leaving on purpose before they buy.
- A discount at the end reads as a last chance. After two reminders, a time-limited code gives a hesitant shopper a reason to decide now.
So the plan is: remind, remind again, and only then offer something.
1. Plan the sequence
A sequence in ShapedRecover is just every active campaign on the same trigger, sent in order of delay. Here's the shape we suggest, which is how the starters ship:
| Sends after | Purpose | Starter campaign | |
|---|---|---|---|
| Reminder | 1 hour | "You didn't quite finish." Catches people while they still remember. | Checkout Abandoned – Soft Reminder |
| Second reminder | 1 day | "We can't hold these much longer," with their items shown. | Checkout Abandoned – Inventory Hold Alert |
| Coupon | 2 days | A personal code that expires quickly and applies itself. | Checkout Abandoned – 10% Discount Offer |
Delays count from when the cart became abandoned (15 minutes of no activity, by default), not from when you set things up. Each email gets its own recovery link, and links work for 7 days by default, so even a shopper who opens the first email late can still use it. See Triggers & Timing.
If a shopper buys at any point, whether through the link or not, the rest of the sequence stops. Nobody who has already ordered gets the coupon.
2. Set up the two reminders
Open Checkout Abandoned – Soft Reminder and Checkout Abandoned – Inventory Hold Alert in Recovery Campaign and check:
- Create a Coupon is off. It is in both starters.
- The text doesn't hint at a discount. "Still thinking it over? We might have something for you" teaches the same lesson as giving the code away.
- The delays are 1 hour and 1 day, both on Checkout abandoned (add Cart abandoned too if many shoppers are logged in, as long as all three emails get the same triggers).
Rewording them is covered in Your First Campaign.
3. Set up the coupon email
Open Checkout Abandoned – 10% Discount Offer. Under Create a Coupon:
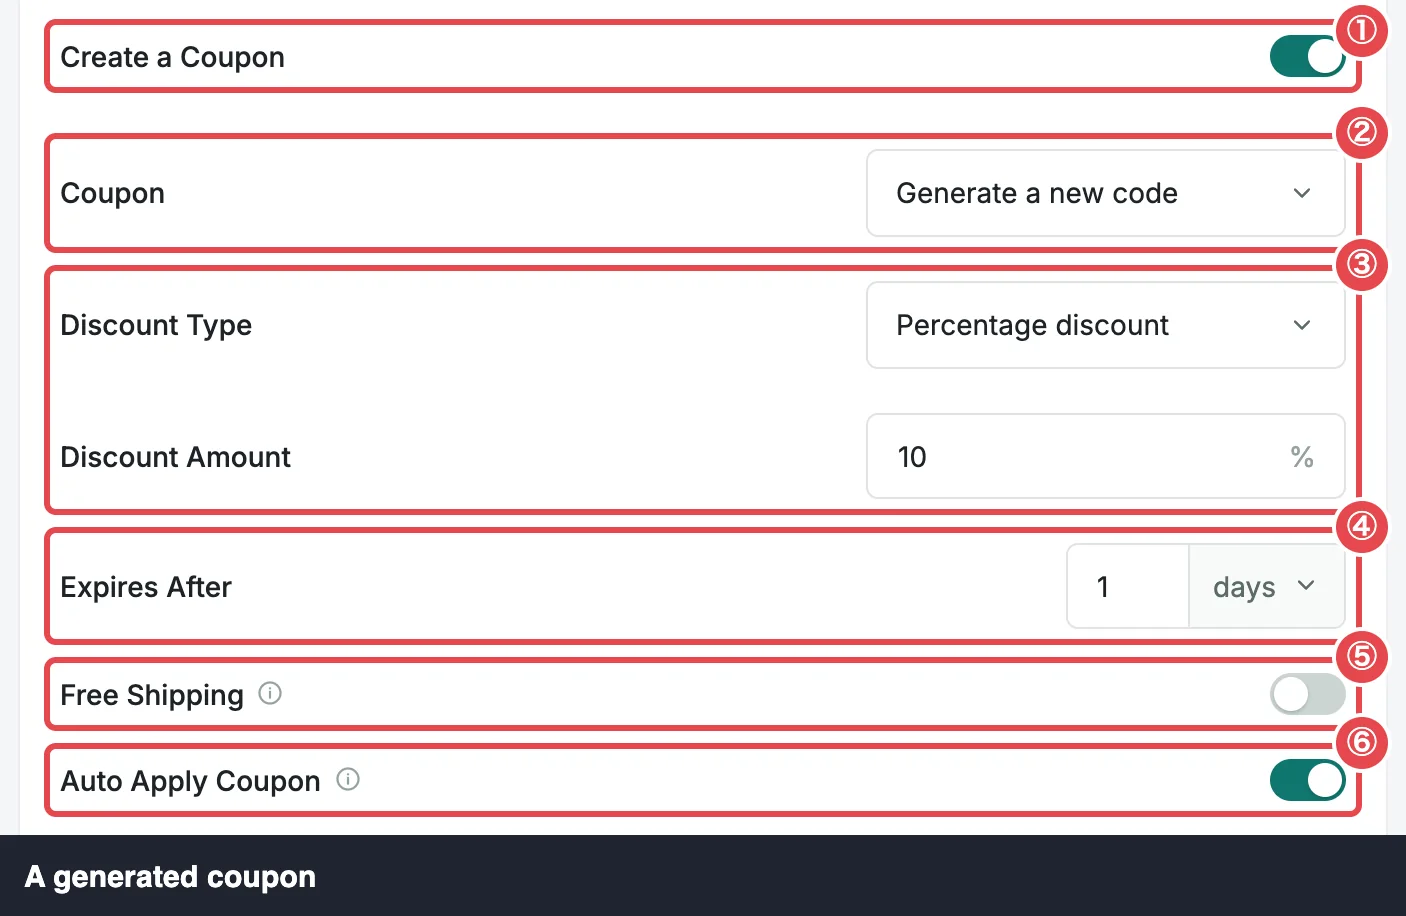
- Coupon: Generate a new code. Every shopper gets their own single-use code, locked to their email address, so a code that's shared on a coupon site is no use to anyone else. Picking an existing coupon instead gives everyone the same code, with whatever limits you set on it in WooCommerce.
- Discount Type and Discount Amount. Start small. 10% is the starter's default and a sensible first test. Raise it only if your numbers say it's needed.
- Expires After: short. The starter uses 1 day. A short window turns "maybe later" into "now", and keeps old codes from lingering. Make sure the email's wording matches; the starter says "expires in 24 hours".
- Auto Apply Coupon: on. The discount is already in the cart when the shopper clicks through, so they don't have to copy a code, and they see the lower total straight away.
- Free Shipping is optional. If you turn it on, check you have a free shipping method that accepts coupons, or WooCommerce won't apply it. See Coupons in Emails.
- Click Save Changes.
If you change the amount or the expiry, update the subject ("Exclusive 10% coupon…"), the campaign name and the body to match. Coupons in Emails covers every coupon field and style.
4. Tighten the coupon rules
Pro
These options need Pro. Without it, generated coupons can't be combined with other coupons and do apply to sale items, which is a safe default for most stores.
Three settings help keep a recovery discount from stacking into more than you meant to give:
- Allow Coupons to Combine (Settings → Coupons, off by default). Leave it off so a shopper can't pair the recovery code with a sitewide sale code.
- Exclude Sale Items (Settings → Coupons, off by default). Turn it on if your sale prices are already as low as you want to go.
- Exclude Products (in the campaign's Create a Coupon). List products that should never be discounted, such as gift cards or low-margin items.
See Codes & Restrictions and Exclude Products.
Coupon cleanup is already on
Generated codes add up: one per shopper per coupon email. ShapedRecover deletes the ones that have expired, or were used more than 7 days ago, every week by default. Codes you made yourself are never touched. You don't need to do anything; Coupon Cleanup has the details if you want to change the schedule.
5. Test and switch on
- Send yourself a test of the coupon email from its ⋮ menu (Send test). The test shows a sample code in your format and never creates a real coupon, so test as often as you like.
- In the Recovery Campaign list, switch the campaigns on in send order: the 1-hour reminder, then the 1-day reminder, then the coupon email.
Want to see a real code applied to a real cart? Test the Recovery Flow shows you how on a test site.
6. Measure and adjust
Give the sequence a few weeks of real carts before judging it, then go to Reports → Recovered Sales:
- Message shows which campaign's email each recovered sale came through. If most sales come from the reminders, the coupon is only needed for a minority, which is exactly what you want.
- Revenue per Message divides recovered revenue by every recovery email sent in the range. It's a rough "what is each email worth" figure, useful for comparing one period with another.
- Recovery Rate shows the share of carts abandoned in the range that ended up recovered.
Each KPI compares with the previous period of the same length, so you can see the effect of a change. See Recovered Sales.
Some adjustments worth trying, one at a time so you can tell what worked:
- Few sales from the coupon email? Try a slightly bigger discount, or free shipping instead of a percentage.
- Lots of sales from the coupon email, few from the reminders? Look at your reminders' subjects and wording before raising the discount.
- Shoppers say the code didn't work? Each code works only for the shopper's own email address and only once. Check the order used the same address the email went to.
When you change a delay, emails already scheduled keep their original send time; new carts use the new one. Wording changes apply to every email not yet sent. See Triggers & Timing.
Where to go next
- Coupons in Emails: every coupon setting and style.
- Attribution & Audit: how a sale is credited to an email.
- Test the Recovery Flow: watch the coupon apply itself on a test site.