

Set Up SMTP
Get recovery emails into inboxes by sending through a proper mail service, and keep the background jobs that send them on time.
Recovery only works if two quiet things work: your site has to send email that arrives, and its scheduled jobs have to run on time. Neither shows an error on your storefront when it breaks, so it's easy to have campaigns switched on and nothing reaching anyone.
This guide is for any store owner setting up ShapedRecover, and for anyone who's seen a test email go missing or the Background jobs are running late warning. It has two parts:
- Reliable email: connect your site to an email service and prove it works.
- Background jobs on time: add a real server cron job so emails go out when they're due.
Most of the work happens outside ShapedRecover, in your email service, your DNS settings and your hosting panel. Every host and provider names things a little differently, so treat the steps below as the shape of the job, and follow your provider's own help pages for the exact clicks.
Reliable email and on-time jobs in 7 steps
- Pick an email serviceA transactional email service, or your host or mailbox SMTP.
- Install an SMTP pluginIt routes all WordPress email through that service.
- Authenticate your domainAdd the SPF, DKIM and DMARC records your service gives you.
- Match your From AddressUse an address on the domain you just authenticated.
- Test every kind of emailThe delivery check, a campaign test and a WooCommerce email.
- Add a server cron jobRun scheduled jobs every 5 minutes, visitors or not.
- Check the jobs are runningLook for shaped_recover in Scheduled Actions.
Part 1: Reliable email
Why WordPress email goes missing
Out of the box, WordPress hands every email to your web server to send. On most shared hosting that server isn't a proper mail server: it doesn't prove it's allowed to send for your domain, many sites share the same server, and some hosts cap or block outgoing mail entirely. Gmail, Outlook and Yahoo treat unproven mail with suspicion, so it lands in spam or is dropped without a trace.
This isn't special to ShapedRecover. Your WooCommerce order confirmations go out the same way and have the same problem.
ShapedRecover sends through WordPress's normal mail function (wp_mail), so it works with whatever mail setup your site has. It doesn't need a particular plugin or service, and it doesn't check which one you use. That also means it never warns you about SMTP: the only way to know your email works is to test it, which you'll do in step 5.
Already sorted?
If your WooCommerce order emails reliably reach customers' inboxes, your mail setup is probably fine. Skip to step 5 to confirm it, then go on to Part 2.
1. Pick an email service
You need somewhere for your site to send email through. You have two kinds of choice:
- A transactional email service. These exist to send email from websites and apps, and they're good at getting it delivered. Well-known ones include Brevo, SendGrid, Mailgun, Amazon SES and Postmark. Many have free or low-cost plans for small volumes. You'll sign up, add your domain and get either an API key or SMTP login details.
- SMTP from your host or mailbox provider. Many hosts include an SMTP server with your hosting or email plan, and business mailboxes like Google Workspace or Microsoft 365 offer SMTP too. This is fine for a small store, but mailbox accounts usually have daily sending limits, so check them.
To estimate how much you'll send: roughly the number of carts abandoned per day, times the number of campaigns you have switched on, plus your normal WooCommerce emails. A store with 20 abandoned checkouts a day and three campaigns sends up to about 60 recovery emails a day.
2. Install an SMTP plugin
An SMTP plugin takes over WordPress's mail function and sends everything through the service you picked: ShapedRecover's emails, WooCommerce's emails and WordPress's own. Popular free options include WP Mail SMTP, FluentSMTP and Post SMTP. ShapedRecover works with any of them, and we don't recommend one over another.
- Go to Plugins → Add New Plugin, search for the plugin you've chosen, then Install Now and Activate.
- Open its settings and pick your email service from its list. Many plugins connect to the big services with an API key instead of SMTP; either works.
- Paste in the API key or SMTP details from step 1 and save.
Use only one SMTP plugin at a time. Two will fight over the same job.
A few of the options you might see are worth a moment:
- Email log. If the plugin offers one, turn it on. When an email goes missing, the log tells you whether WordPress sent it and what the service replied.
- Force From Email / Force From Name (names vary). When this is on, the plugin replaces the sender on every email, including ShapedRecover's. That's fine if it matches what you want shoppers to see; otherwise leave it off so ShapedRecover's From Name and From Address are used.
3. Authenticate your domain
Your email service will ask you to verify or authenticate your domain. This is the step that does the most for delivery. It means adding a few DNS records, small text entries that tell the world's mail servers your email is genuine.
| Record | What it says |
|---|---|
| SPF | Which servers are allowed to send email for your domain. A domain has only one SPF record, so if you already have one, add the new service to it rather than creating a second. |
| DKIM | A digital signature on each email, proving it really came from your domain and wasn't changed on the way. Your service gives you the exact record or records. |
| DMARC | What receiving servers should do with mail that fails the first two checks. If you don't have one, a monitoring-only policy (p=none) is a safe start. |
Add them wherever your domain's DNS is managed: your domain registrar, your host's control panel, or a DNS provider like Cloudflare. Copy the values exactly as your service shows them. DNS changes can take anything from minutes to a few hours to be seen; your service's dashboard tells you when the domain is verified.
Gmail and Yahoo now expect senders to have SPF, DKIM and DMARC in place, so this step matters even for a small store.
4. Match your From Address
The address your emails come from should be on the domain you just authenticated. Mail from hello@yourstore.com, sent through a service authorised for yourstore.com, passes the checks. The same email sent "from" a Gmail address, or from a different domain, fails them and is likely to end up in spam.
- Go to ShapedRecover → Settings → Sending.
- Under Email Sender, set From Name (usually your store's name) and From Address (an address on your authenticated domain).
- Set Reply-to Address to an inbox someone reads, or leave it blank to use the From Address. Replies don't affect delivery, so this one can be any address.
- Click Save Changes.
Do the same for WooCommerce's sender in WooCommerce → Settings → Emails, so your order emails pass the checks too. Sending Settings covers every sender field.
5. Test every kind of email
Test three ways, because each one proves something different.
The delivery check. In Settings → Sending → Delivery Check, enter an address and click Send Test Email. You'll see Test email sent to your address if WordPress handed the message on, or the error your mail setup reported. This proves your site can send at all.
It's a plain message, and it's sent with WordPress's default sender, not your ShapedRecover From Name and From Address (unless your SMTP plugin forces a sender). So it doesn't show whether your From Address passes the checks. That's what the next test is for.

A campaign test. Go to Recovery Campaign, open a campaign's ⋮ menu and choose Send test. This is a real recovery email, with your sender, design and plain-text version, filled with a sample shopper. See Test Email.
Send it to a Gmail or Outlook address if you have one, as well as your own, and check:
- It lands in the inbox, not spam.
- The sender shows your From Name and From Address.
- In Gmail, Show original (in the ⋮ menu of the open email) lists SPF, DKIM and DMARC. All three should say PASS.
A WooCommerce email. Place a test order, or resend an order email from an existing order, and check it arrives. If ShapedRecover's emails get through but WooCommerce's don't, or the other way round, compare the two senders from step 4.
Troubleshooting email
- "Test email sent", but nothing arrives. Check spam first. Then check your SMTP plugin's email log and your email service's activity log: they show whether the message was accepted, bounced or blocked.
- The test shows an error. The text is what your mail setup reported, often a wrong password, API key or port. Re-check your SMTP plugin's settings against your service's instructions.
- It arrives, but in spam. Your DNS records from step 3 are missing or not verified yet, or your From Address is on a different domain. Gmail's Show original tells you which check failed.
- A cart's timeline shows Failed. ShapedRecover retried that email over about five hours and every attempt failed. The detail is your mail system's error. See How Sending Works.
Part 2: Background jobs on time
What the late-jobs warning means
ShapedRecover's work happens in the background. A job called the sweep runs every 5 minutes: it marks carts as abandoned, sends the emails that are due and closes carts that are lost. A second job runs once a day, at 03:00 your site's time, for housekeeping such as coupon cleanup.
If the sweep falls more than 15 minutes behind while tracking is on, every ShapedRecover tab shows this warning:
Background jobs are running late, so recovery emails and cart statuses are delayed. WordPress runs scheduled jobs when the site gets visits; a server cron job keeps them on time.

View Scheduled Actions takes you to the jobs list. You can't dismiss the warning; it clears itself on the first page load after the sweep runs again. A one-off warning after a quiet night is nothing to worry about. If you see it often, carry on with this part.
Why jobs run late
WordPress has no clock of its own. Its scheduler, WP-Cron, only runs when someone loads a page on your site. ShapedRecover's jobs run through Action Scheduler, the job runner inside WooCommerce, and Action Scheduler is started by WP-Cron.
On a busy store that's fine: there's always a visitor. On a quiet store, overnight, or on a staging site, nobody visits, so nothing runs, and a reminder due at 2 a.m. goes out when the first visitor arrives. The same happens if your site has WP-Cron switched off (DISABLE_WP_CRON) and no real cron job replacing it.
The fix is a server cron job: a task on your hosting server that calls WordPress every few minutes, whether anyone visits or not.
6. Add a server cron job
Ask your host first
Some managed WordPress hosts already run a server cron job for you, or have their own setting for it. A quick message to their support saves guesswork, and they can often set it up for you.
1. Create the cron job. Look in your hosting control panel for Cron Jobs, Scheduled Tasks or similar (names vary). Add a job that runs every 5 minutes, which matches how often the sweep runs, with one of these commands. Replace the address or path with your own.
Using curl:
curl -s "https://yourstore.com/wp-cron.php?doing_wp_cron" > /dev/null 2>&1Or using wget:
wget -q -O - "https://yourstore.com/wp-cron.php?doing_wp_cron" > /dev/null 2>&1Or, if your server has WP-CLI installed, run the due jobs directly:
cd /path/to/your/wordpress && wp cron event run --due-now > /dev/null 2>&1In a crontab, "every 5 minutes" is written */5 * * * * in front of the command. Many control panels give you a dropdown for it instead.
2. Stop visits from triggering WP-Cron. Once the server job is running, add this line to your site's wp-config.php, above the line that says That's all, stop editing!:
define( 'DISABLE_WP_CRON', true );Now scheduled jobs run on your server's clock instead of on page visits, which also takes a little work off your visitors' page loads.
Cron job first, then DISABLE_WP_CRON
Never add DISABLE_WP_CRON without a working server cron job. With nothing calling WordPress, scheduled jobs barely run at all, and recovery emails pile up unsent. If you're not comfortable editing wp-config.php, it's fine to skip this step: the cron job alone already keeps jobs on time.
7. Check the jobs are running
- Go to WooCommerce → Status → Scheduled Actions. (The warning's View Scheduled Actions link opens it already filtered.)
- Search for
shaped_recover. - On the Pending view you should see one
shaped_recover_sweepand oneshaped_recover_daily. You may also see a one-off follow-up run while a large batch of emails is going out. - On the Completed view,
shaped_recover_sweepshould appear about every 5 minutes. - There should be no Past-due view at all: it only appears while something is late. If it's there with a pile of ShapedRecover actions in it, jobs still aren't being run.
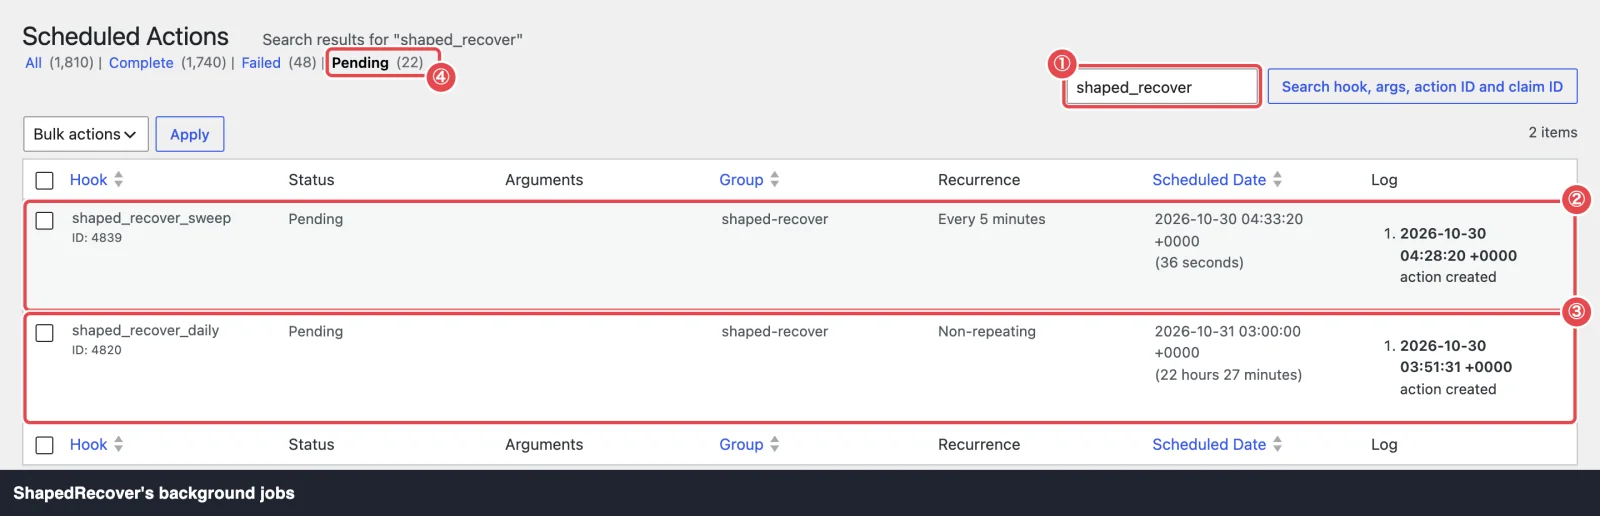
If a job is missing, open any page in your WordPress admin: ShapedRecover puts missing jobs back on the next admin page load. Leave it 15 minutes after setting up the cron job, then check the late-jobs warning has gone from the ShapedRecover tabs. Requirements has more on what the jobs do.
You're done when
- A campaign test email lands in your Gmail or Outlook inbox, from your own domain, with SPF, DKIM and DMARC passing.
- Your WooCommerce order emails arrive too.
- Scheduled Actions shows the sweep completing every 5 minutes, and no late-jobs warning appears on the ShapedRecover tabs.
Where to go next
- Your First Campaign: put the starter emails live.
- Test the Recovery Flow: abandon a cart yourself and watch the whole flow.
- How Sending Works: the sweep, retries and what's checked before each email.