

Quick Start
Get recovery live in four steps with the Dashboard setup checklist.
When you first open ShapedRecover → Dashboard, you'll see a welcome screen, Bring Back the Sales You Almost Lost, with a Set Up Recovery checklist under it. Each step ticks itself off when the real thing is done, so the checklist always tells the truth about where you are.
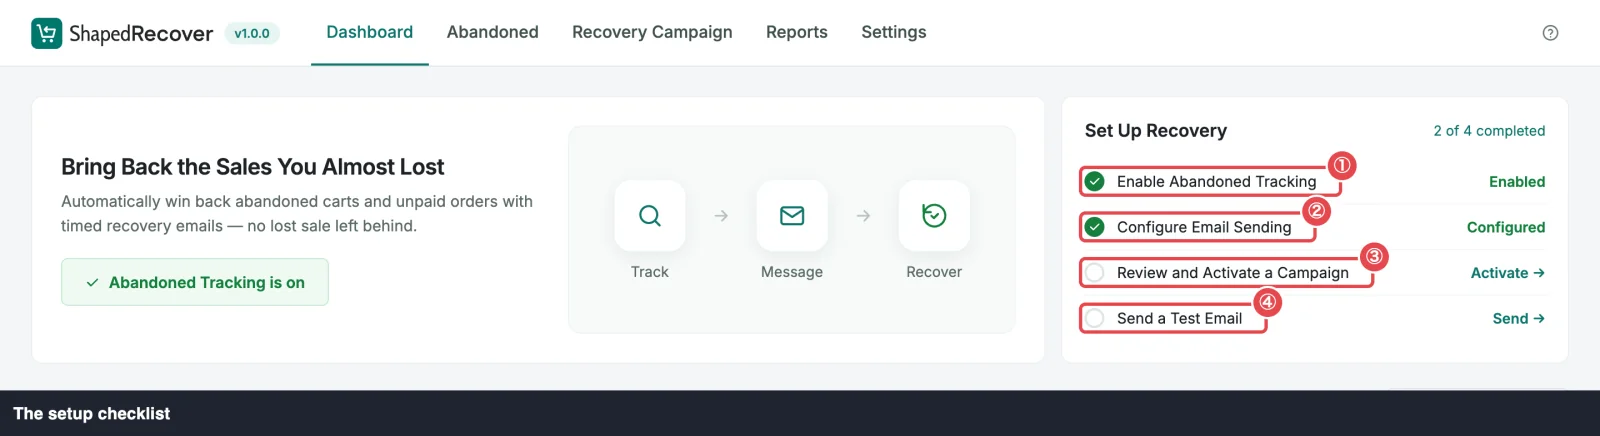
Live in 4 steps
- Enable Abandoned TrackingStart capturing carts at checkout.
- Configure Email SendingConfirm who your emails come from.
- Review and Activate a CampaignSwitch on at least one recovery email.
- Send a Test EmailSee exactly what shoppers will get.
Before you start
Recovery emails are only as good as your site's email delivery. If you're not sure your WooCommerce emails reach inboxes, do Set Up SMTP first. It's the most common reason recovery "doesn't work".
1. Enable Abandoned Tracking
Tracking is off until you turn it on. Click Enable Abandoned Tracking in the welcome screen, or the step's link in the checklist. It switches on right there; you don't leave the Dashboard.
From now on, shoppers who type their email at checkout and keep the consent box ticked are captured. How Recovery Works explains exactly when.
You can turn tracking off again any time in Settings → General. See General Settings.
2. Configure Email Sending
Click Set Up →. It opens Settings → Sending with From Name and From Address already filled in from your WooCommerce email settings. Check they're what you want shoppers to see, change them if not, and click Save Changes. Saving completes the step.
While you're there, it's worth sending yourself a quick check with Send Test Email in the same section. If it fails, see Set Up SMTP. See Sending Settings for every option.
3. Review and Activate a Campaign
Click Activate → to open the Recovery Campaign tab. You'll find three ready-made campaigns, all switched off:
- Checkout Abandoned – Soft Reminder, 1 hour after abandonment.
- Checkout Abandoned – Inventory Hold Alert, 1 day after, with a table of the cart's products.
- Checkout Abandoned – 10% Discount Offer, 2 days after, with a personal coupon.
Open one to read it and adjust the wording, then switch it on with the toggle in the list. One active campaign completes the step. Turning on all three gives you a classic reminder → reminder → discount sequence.
Campaign List and Email Editor cover this tab in full.
4. Send a Test Email
Click Send →, then send a test from a campaign: Send test in its ⋮ menu in the list, or Send Test Email at the top of the editor. The test uses a sample shopper and cart, so you see the real layout with realistic content. When it's sent successfully, the step ticks off.
Open the email on your phone as well as your desktop. That's how most shoppers will read it. See Test Email.
You're live
With all four steps done, the checklist shows Dismiss, which hides it for everyone on the site.
The welcome screen stays until ShapedRecover captures its first cart. From then on the Dashboard shows its normal view: your numbers, the chart, and a banner that reads Recovery is active while tracking is on and at least one campaign is active. If either stops being true, the banner says what's missing. See Dashboard Overview.
Now recovery runs on its own. The next carts abandoned at your checkout will show up under Abandoned, and emails will go out on schedule.
Want to see it work?
Don't wait for a real shopper. Test the Recovery Flow walks you through abandoning a cart yourself, getting the email and coming back through the link.
Where to go next
- Your First Campaign: tailor the emails to your store.
- Dashboard Overview: what the numbers mean.
- Carts Table: where captured carts show up.